Spring Security 简介、原理及使用
本文为《软件安全》课程上课分享内容,主要介绍Security框架的基本概念、结合代码分析原理、以及常见的使用场景。
Spring Security
权限控制概念介绍
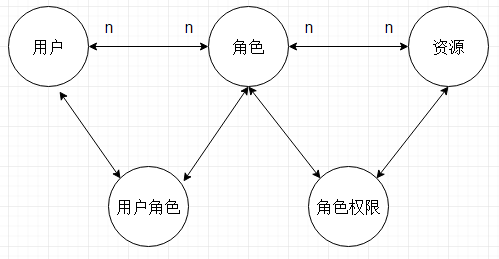
Spring Security 是一个基于 Spring 框架的安全认证和访问控制框架,它为应用程序提供了安全保护。它使用一系列过滤器和拦截器来拦截请求并执行身份验证和授权操作。
常见的权限控制方法
认证(Authentication)
验证用户的身份,确保他们是合法用户。
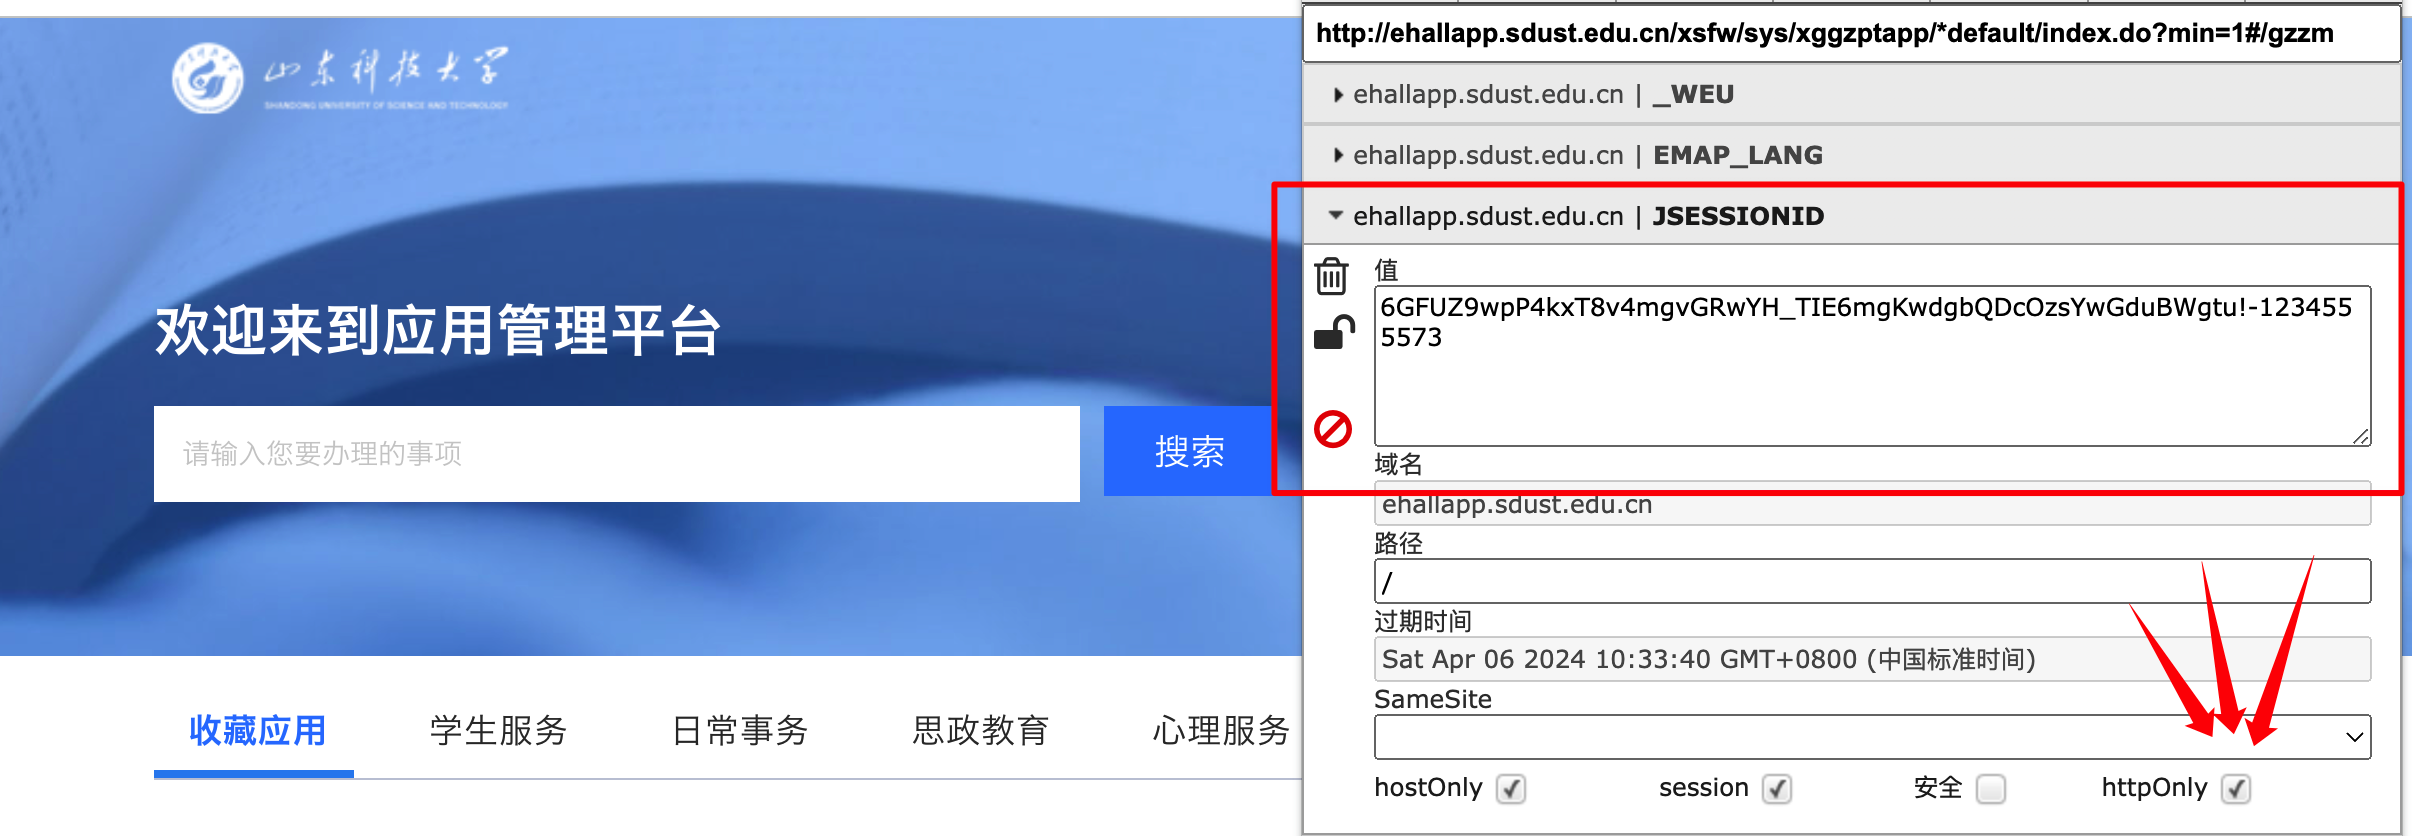
Session和Bearer Token是Web中常见的身份认证机制。
Session方法
Session是一种服务器端的认证机制,它通过在服务器端保存用户的登录状态来进行身份认证。
在用户登录后,服务器会为该用户创建一个会话(Session),并将会话ID存储在Cookie或URL中发送给客户端。客户端在后续的请求中,将会话ID发送
给服务器,服务器使用该ID来识别当前请求是由哪个用户发送的。
Session适用于需要在服务器端保存用户状态信息的场景,例如需要进行会话管理、限制同一用户在多个地方同时登录等场景。
session.setAttribute("key", "new value");
Bearer Token方法
Bearer Token是一种基于Token的身份认证机制,在客户端保存用户的登录状态它将用户的身份信息和授权信息封装在一个Token中,并将Token作为Authorization请求头的Bearer字段发送给服务器,服务器使用Token中的信息进行身份认证和授权。
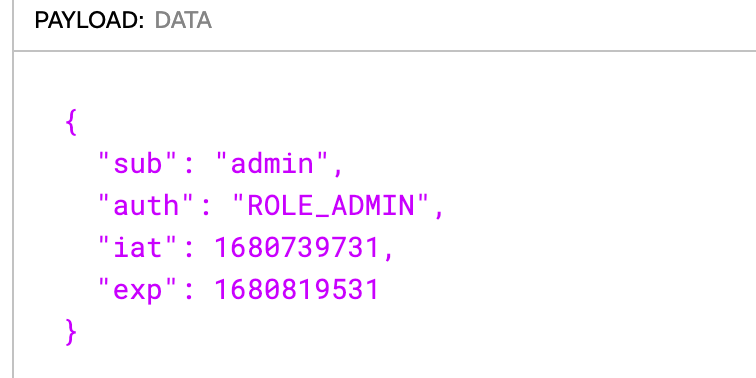
Bearer Token通常使用JWT(JSON Web Token)或OAuth 2.0等技术实现。JWT是一种开放标准,可以将用户的身份信息和其他相关信息封装在一个JSON格式的Token中。
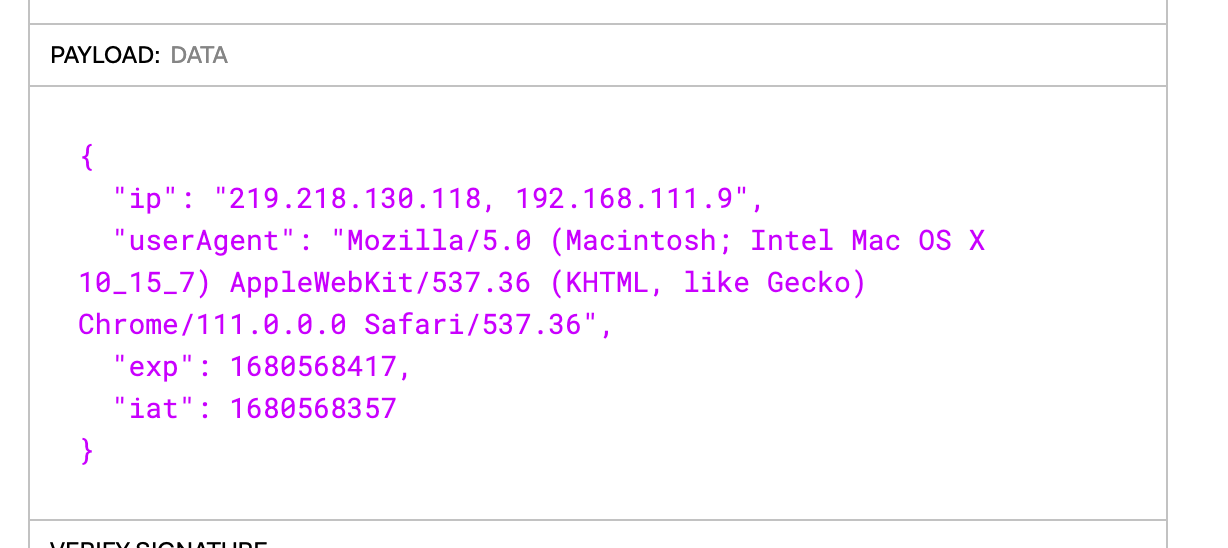
JWT结构:header.payload.signature
- header:存放加密方式、token类型。
- payload:存放你需要存储的内容。
- signature:是JWT安全性的唯一保障,后端签发JWT时使用提前设置好的密钥,对payload进行一次
HMAC运算。当用户传入JWT Token时,服务端先验证签名是否正确。这样,防止了用户对payload的篡改。
两种方法比较
| Session | Token | |
|---|---|---|
| 数据存储位置 | 服务端 | 客户端 |
| 会话修改 | ✅可原生实现 | ❌需自行处理,因为Token签发后不可变 |
| 限制同一用户异地同时登陆 | ✅可原生实现 | ❌需自行处理,例如使用Redis缓存已签发的Token |
| 分布式、微服务 | ❌需自行实现共享,例如使用Redis缓存SessionID和Session内容 | ✅可原生实现 |
| 防CSRF | ❌因为SessionID存放在Cookie中,Cookie具有同源性,对同一个站点的请求会自动加上Cookie | ✅因为Token需要显式加入请求头中 |
| 安全性 | 较高,不用担心会话遭用户篡改 | 非常依赖于JWT密钥的长度,若长度较短,容易被离线暴力穷举。此外JWT Body部分为明文base64,不适合存保密信息。 |
授权(Authorization)
授权用户访问特定的资源或操作。
加密(Encrypt)
Spring Security提供了多种密码加密算法,常用的有BCrypt、SCrypt、PBKDF2、SHA-256等。
密码加密例子:

防止 CSRF 攻击(X-CSRF)
在表单提交时,验证表单是否来自合法来源。
- Synchronizer Token Pattern(同步令牌模式):在这种模式下,服务器会为每个用户会话生成一个令牌,并将令牌添加到每个表单中(CSRF Token)。在表单提交时,令牌将被一起提交。
以山东科技大学智慧校园为例:
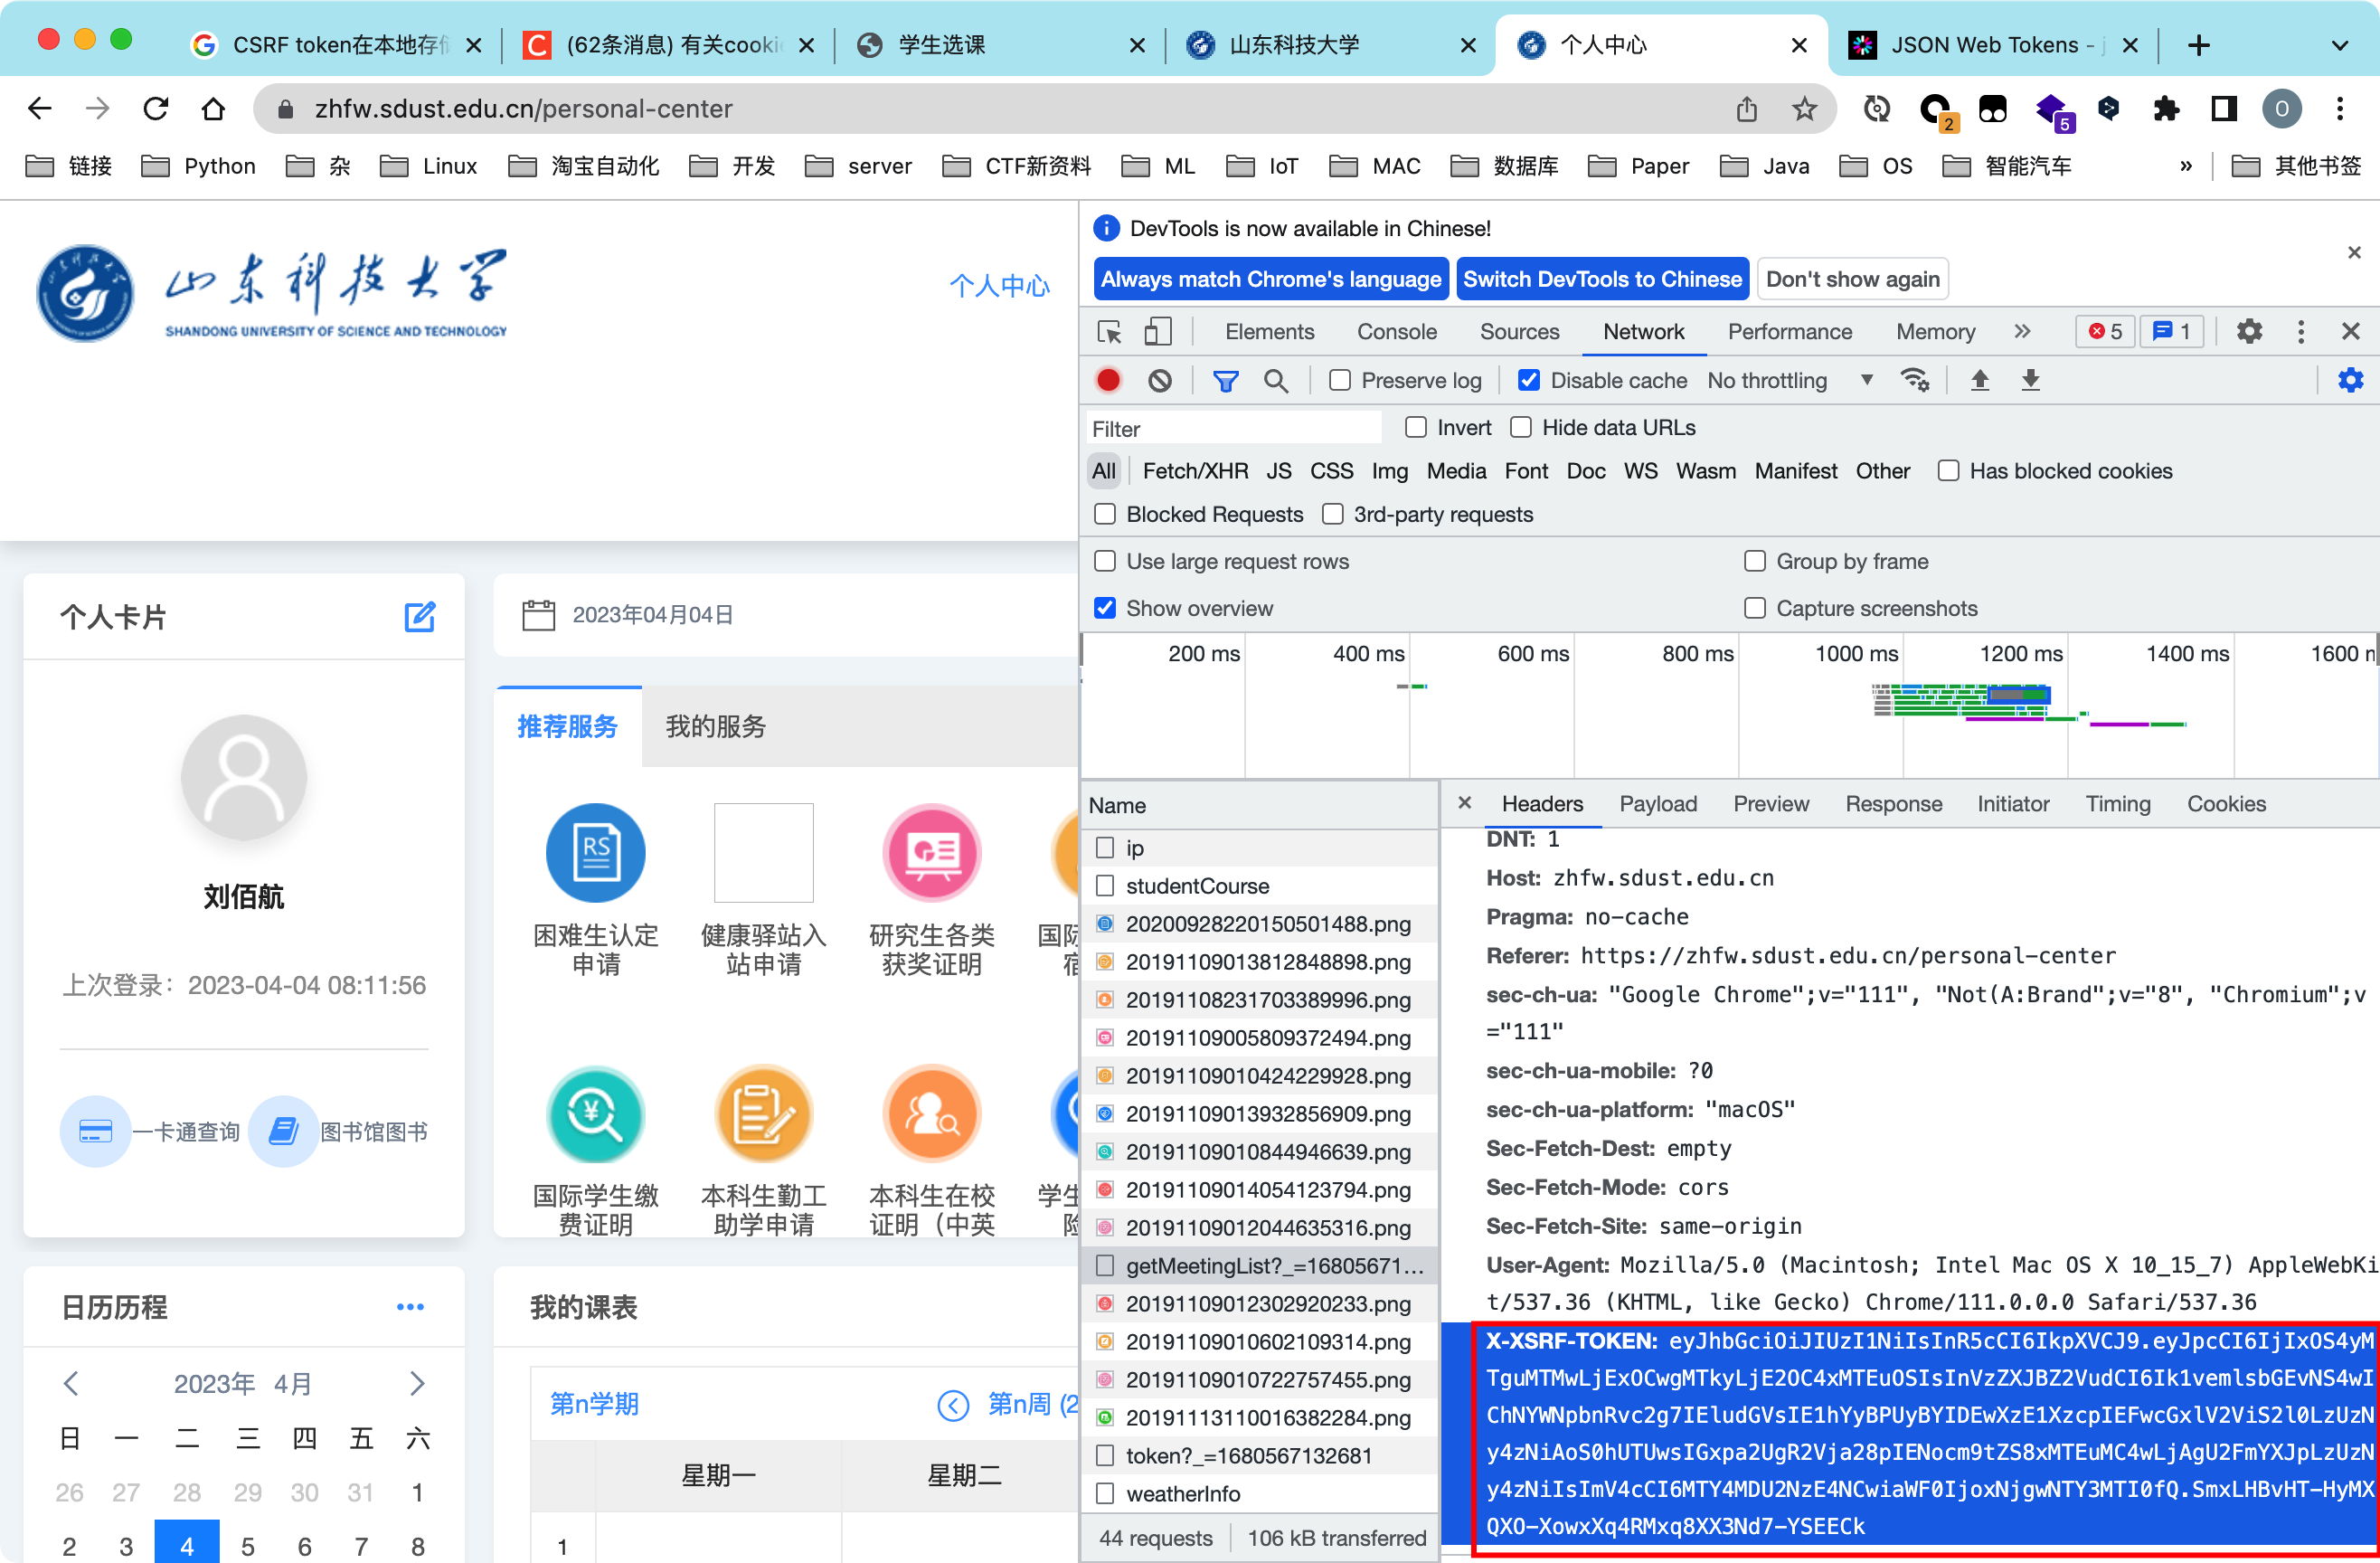
X-XSRF-TOKEN:这个Token显然不是用来鉴权,而是可以防止CSRF。
但是,发现后端似乎没有对该CSRF Token做验证,没有这个字段依然可以正常请求。
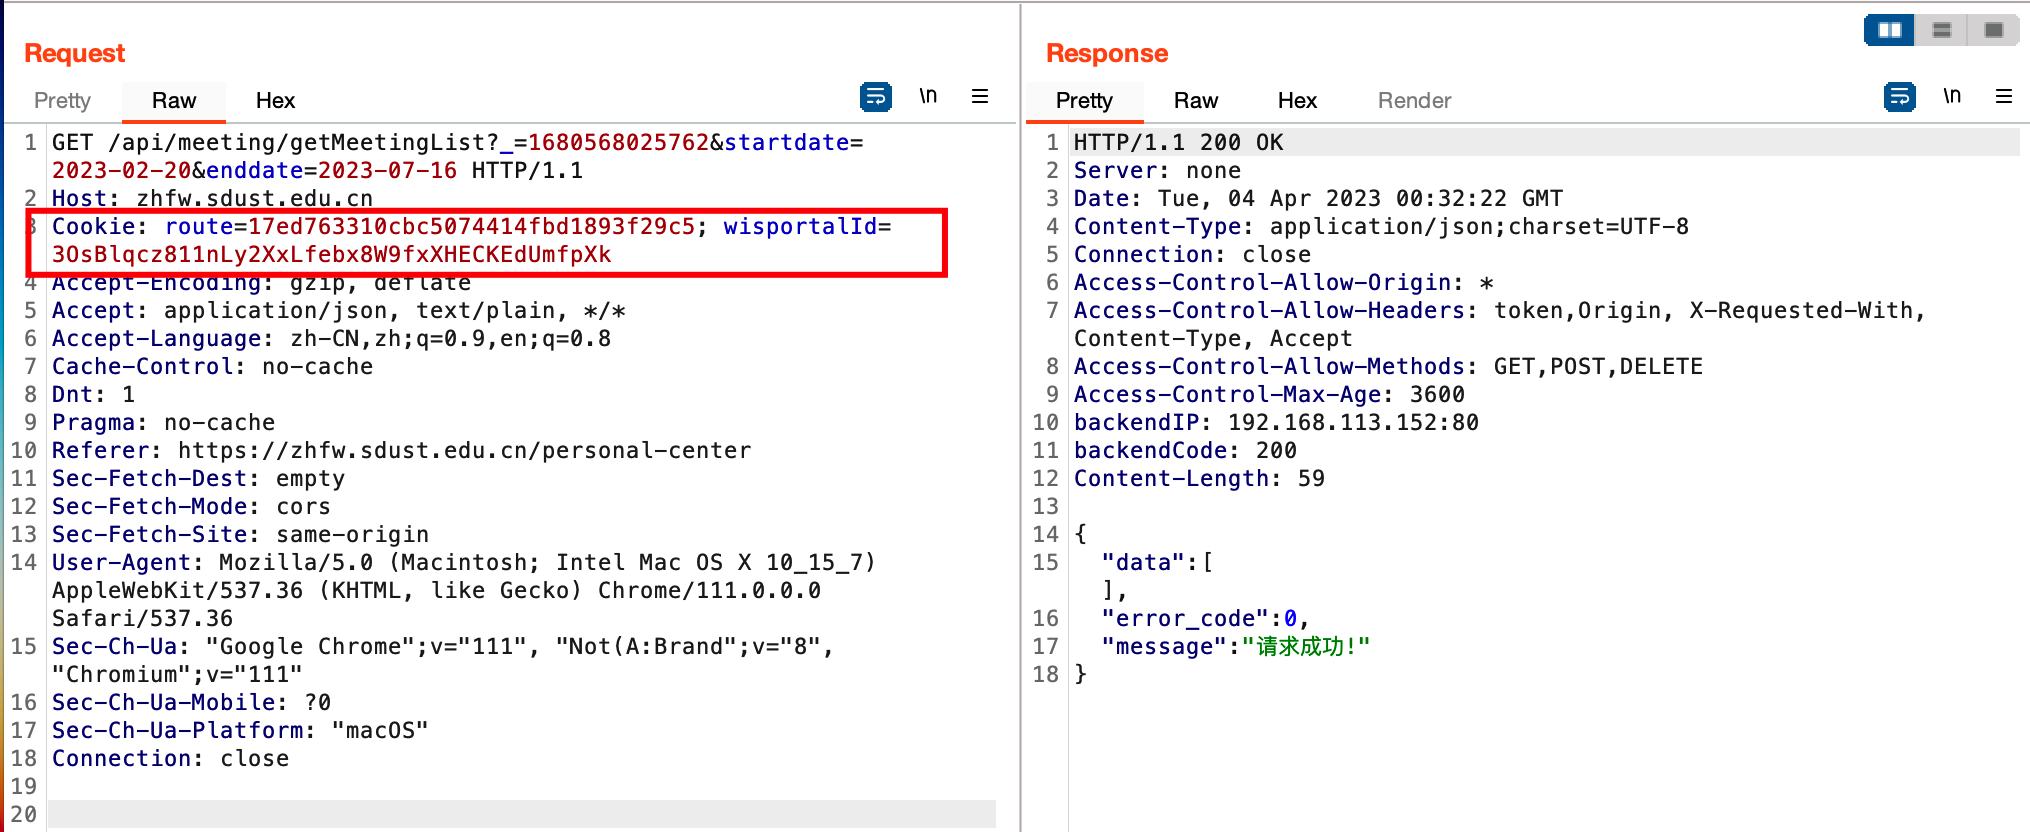
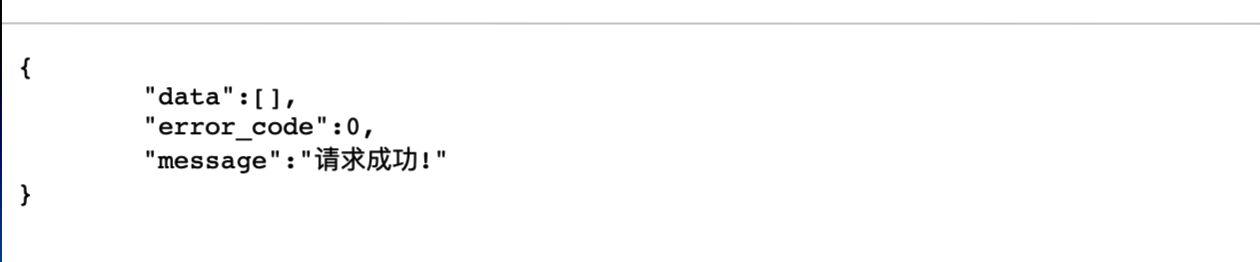
构造一个无害的CSRF利用页面,js跳转到获取个人会议列表的页面。
1 | <script> |
记住我(Remember Me)
在用户关闭浏览器后仍然保持登录状态。
以山东科技大学CAS为例,勾选记住我后,密码以RSA加密存储在本机Cookies中。
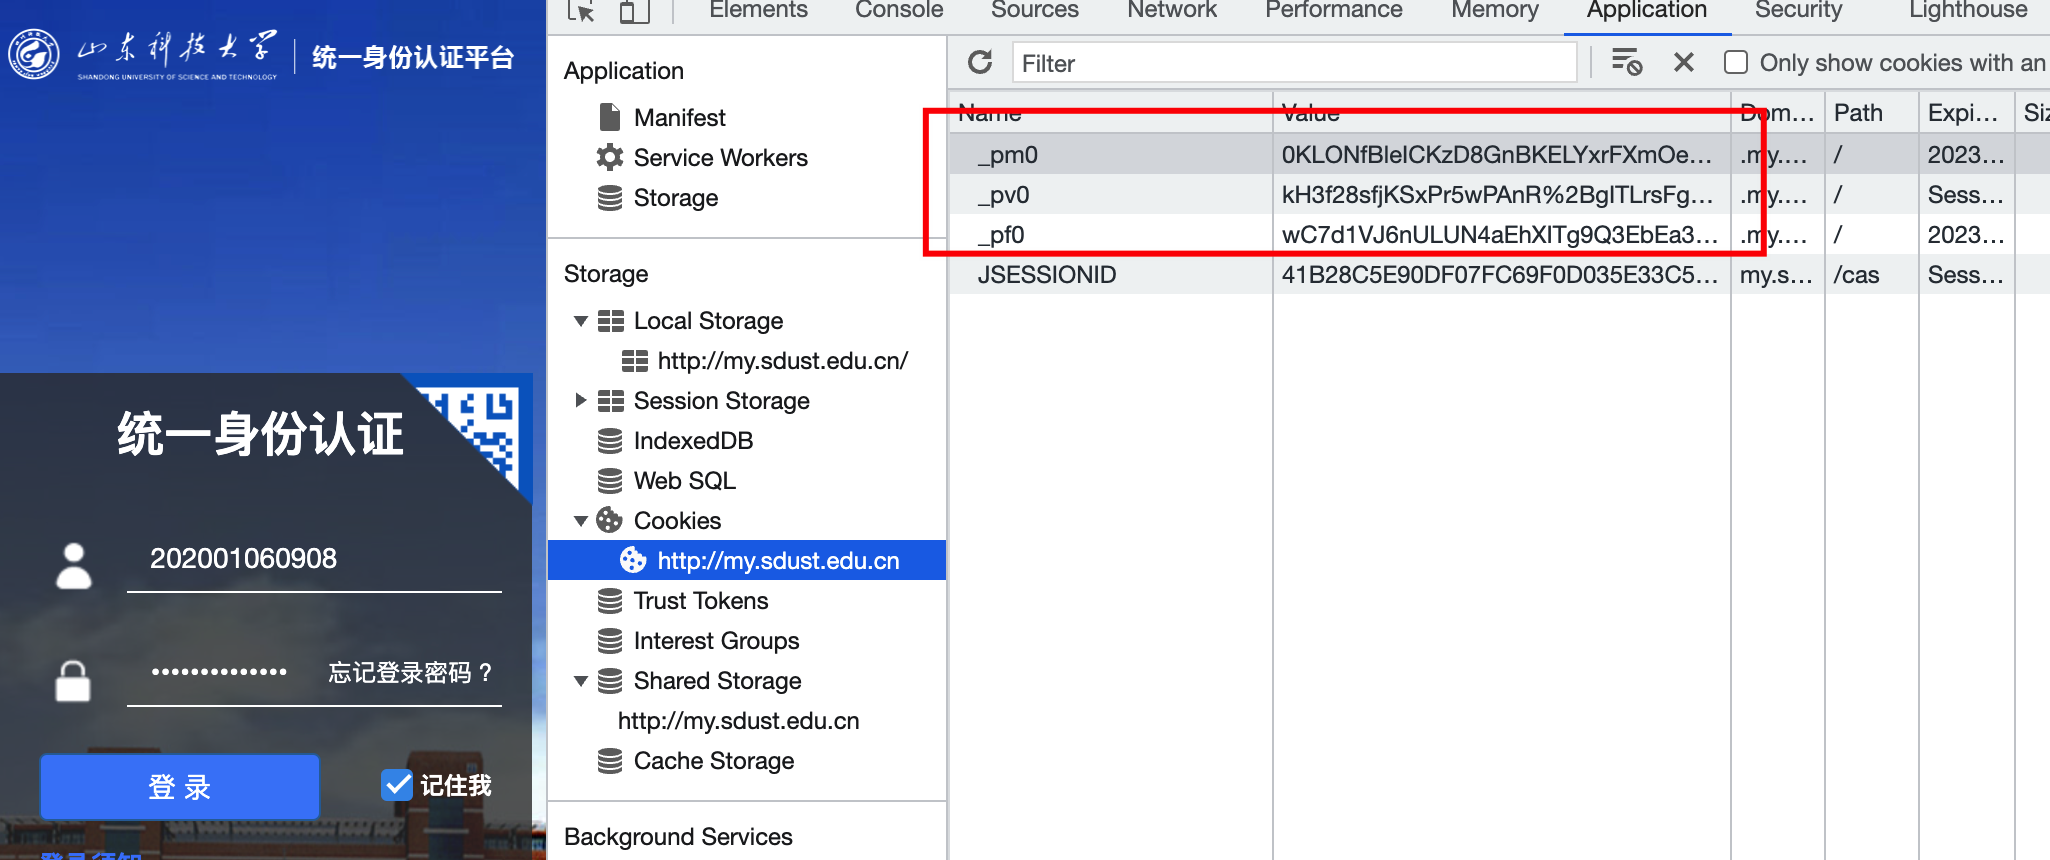
公钥从服务器获取:
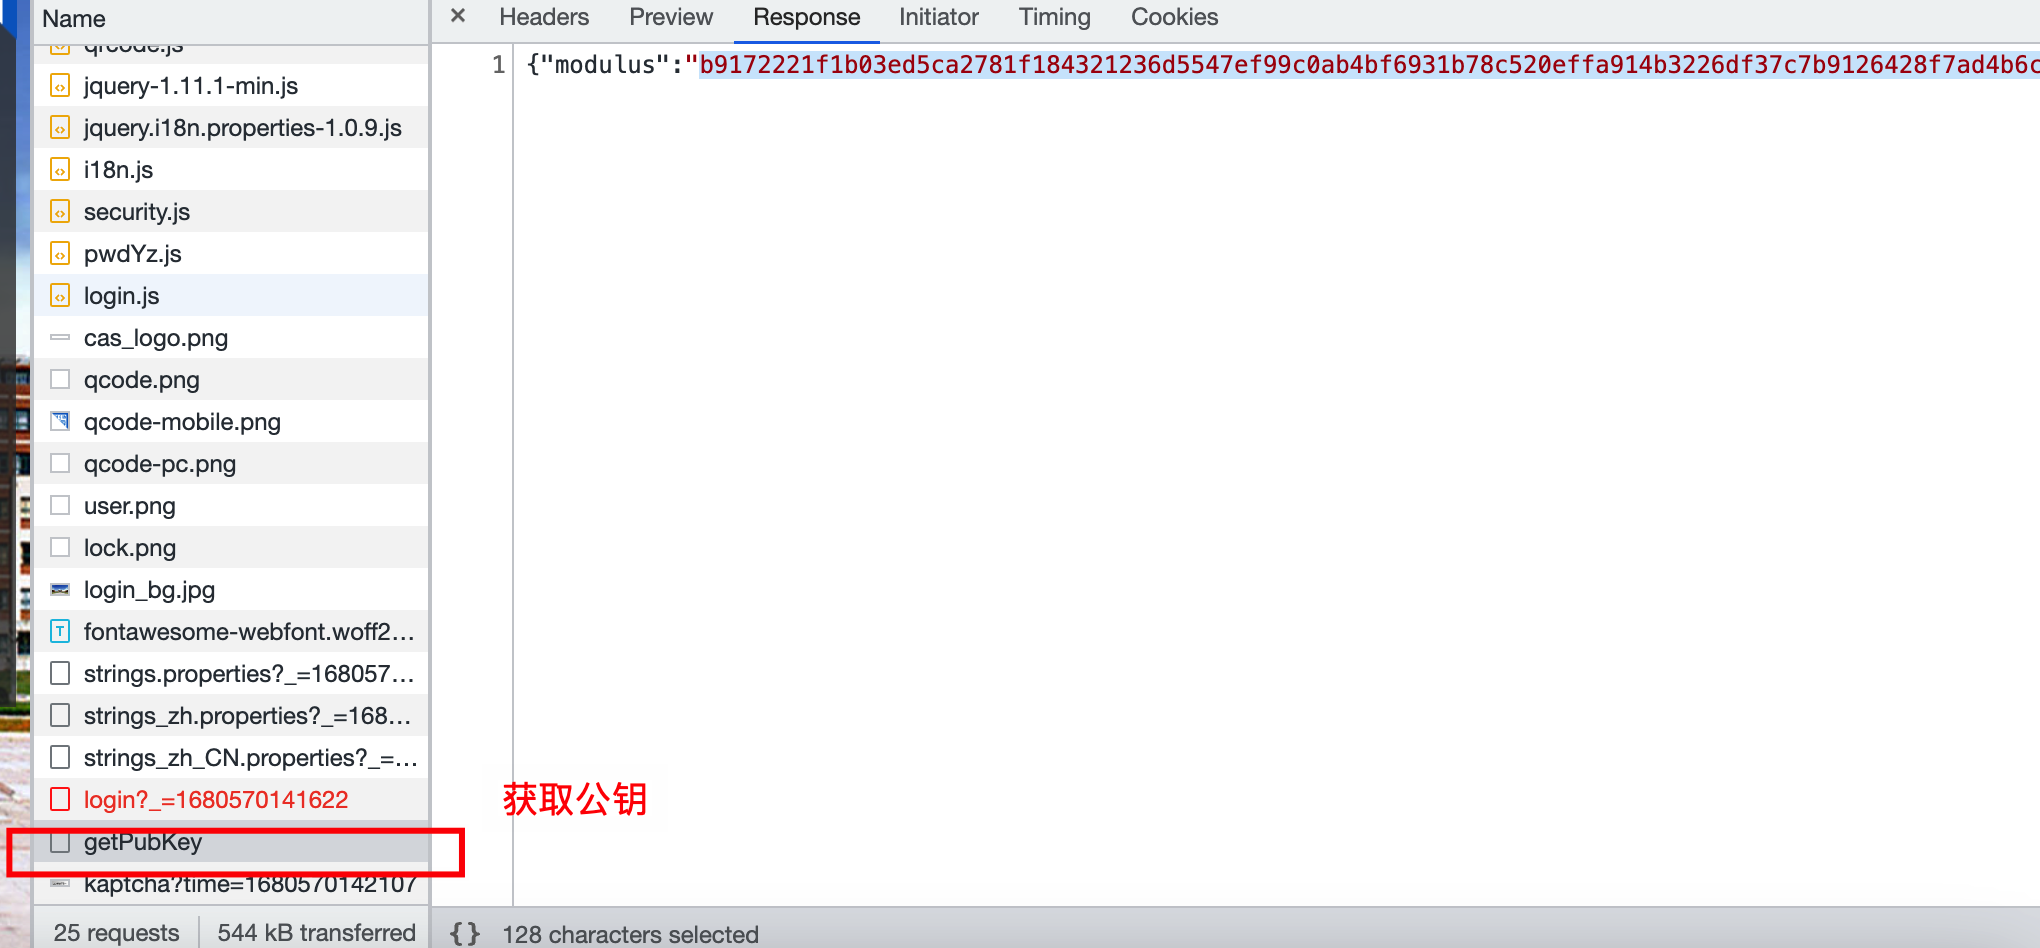
观察Spring Security中记住我的实现,发现也是加密存储的。存储在Cookie中。
TokenBasedRememberMeServices.class
1 | int tokenLifetime = this.calculateLoginLifetime(request, successfulAuthentication); |
多种身份验证方式
支持基于表单、HTTP 基本认证、OAuth2、OpenID 等多种认证方式。
Spring Security 是一个高度可定制的框架,可以根据应用程序的需求进行配置和扩展。它还提供了许多与其他 Spring 框架和第三方库的集成,例如 Spring Boot、Spring Data、OAuth2 和 LDAP 等。
Spring Security 的核心概念及其实现
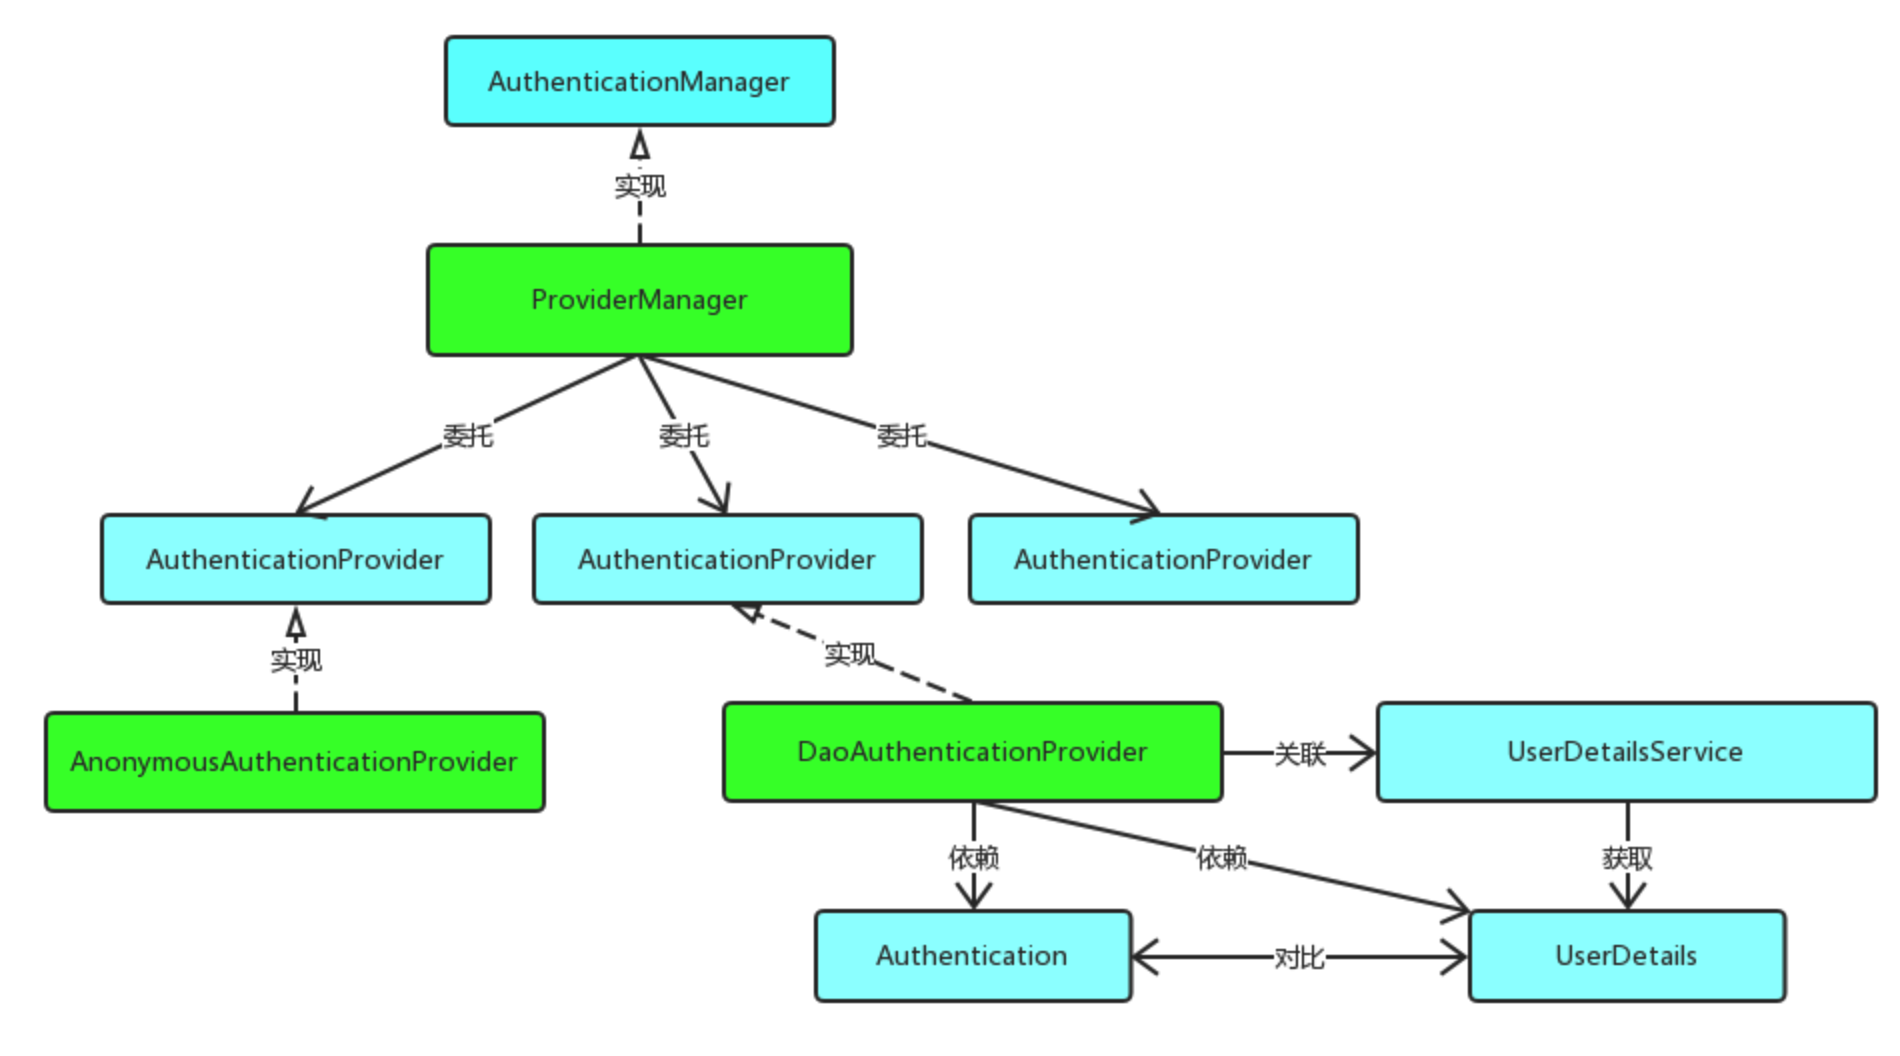
身份验证(Authentication)
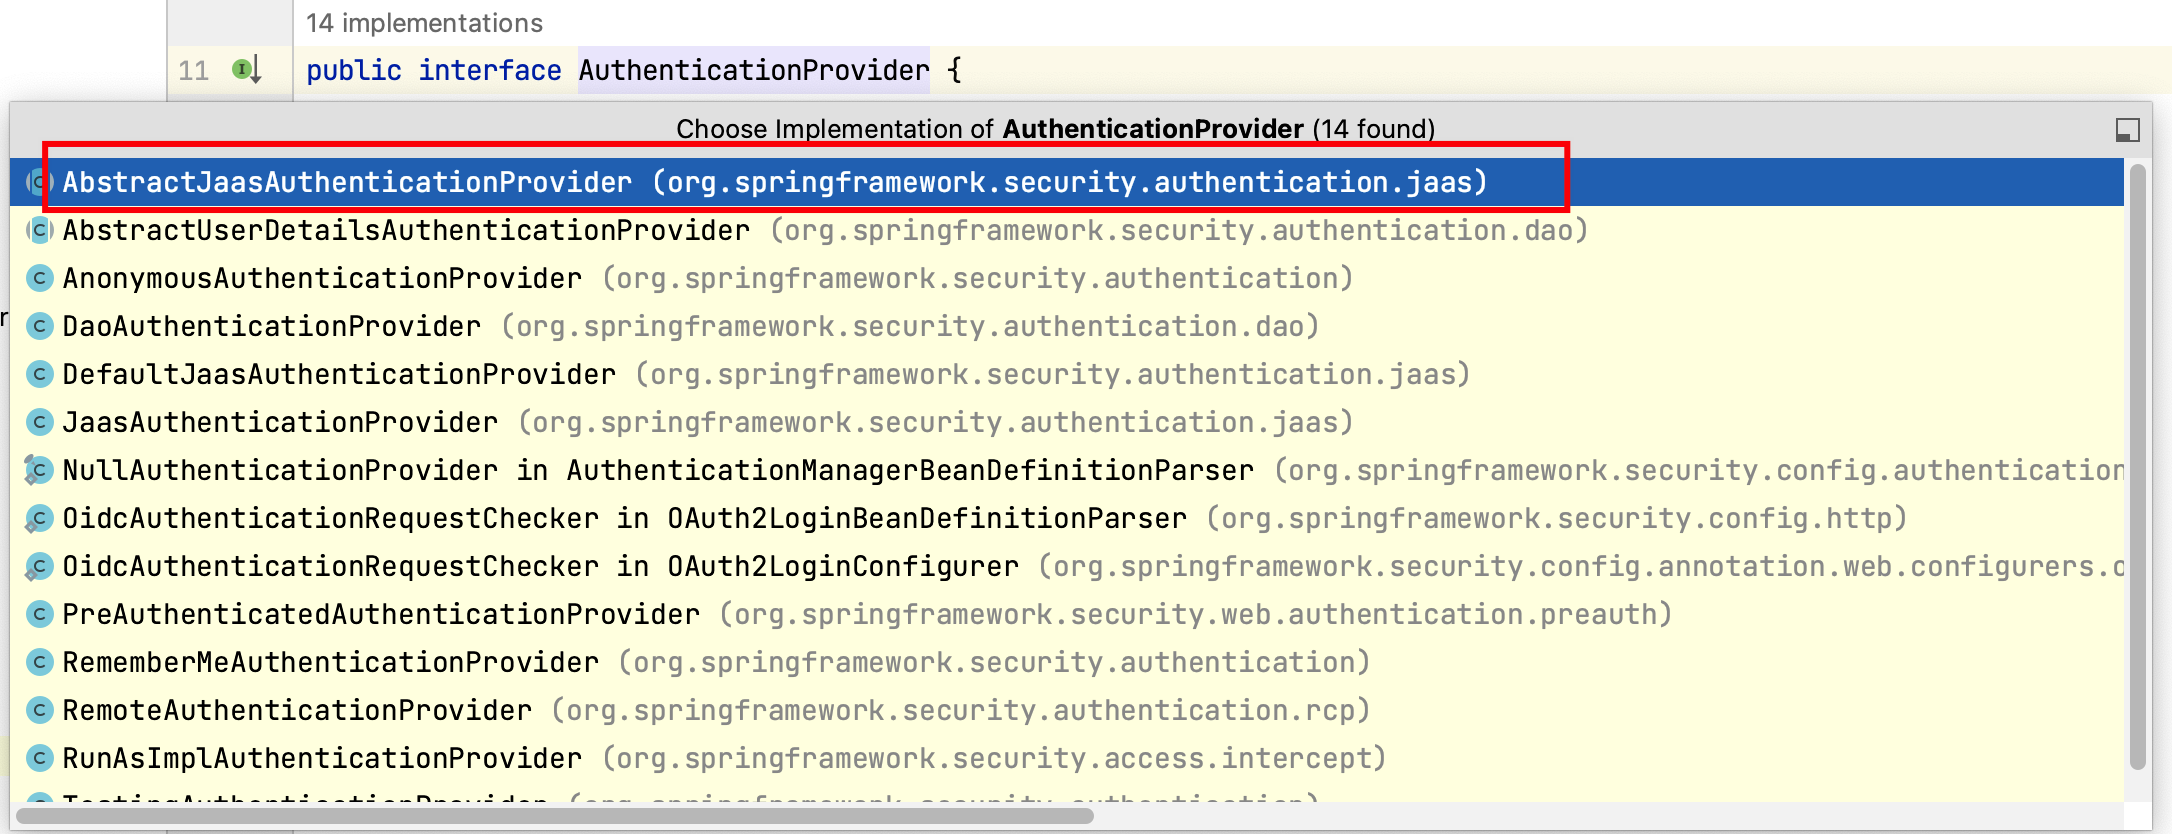
核心是AuthenticationManager和AuthenticationProvider。
AuthenticationProvider接口:是身份认证的具体实现,可以通过实现这个接口来定制我们自己的认证逻辑,它的实现类有很多,默认的是JaasAuthenticationProvider, DaoAuthenticationProvider也比较常用。
AuthenticationManager接口:**负责调用一个或多个AuthenticationProvider进行身份认证,并返回一个Authentication**对象表示认证结果。

访问控制(Authorization)
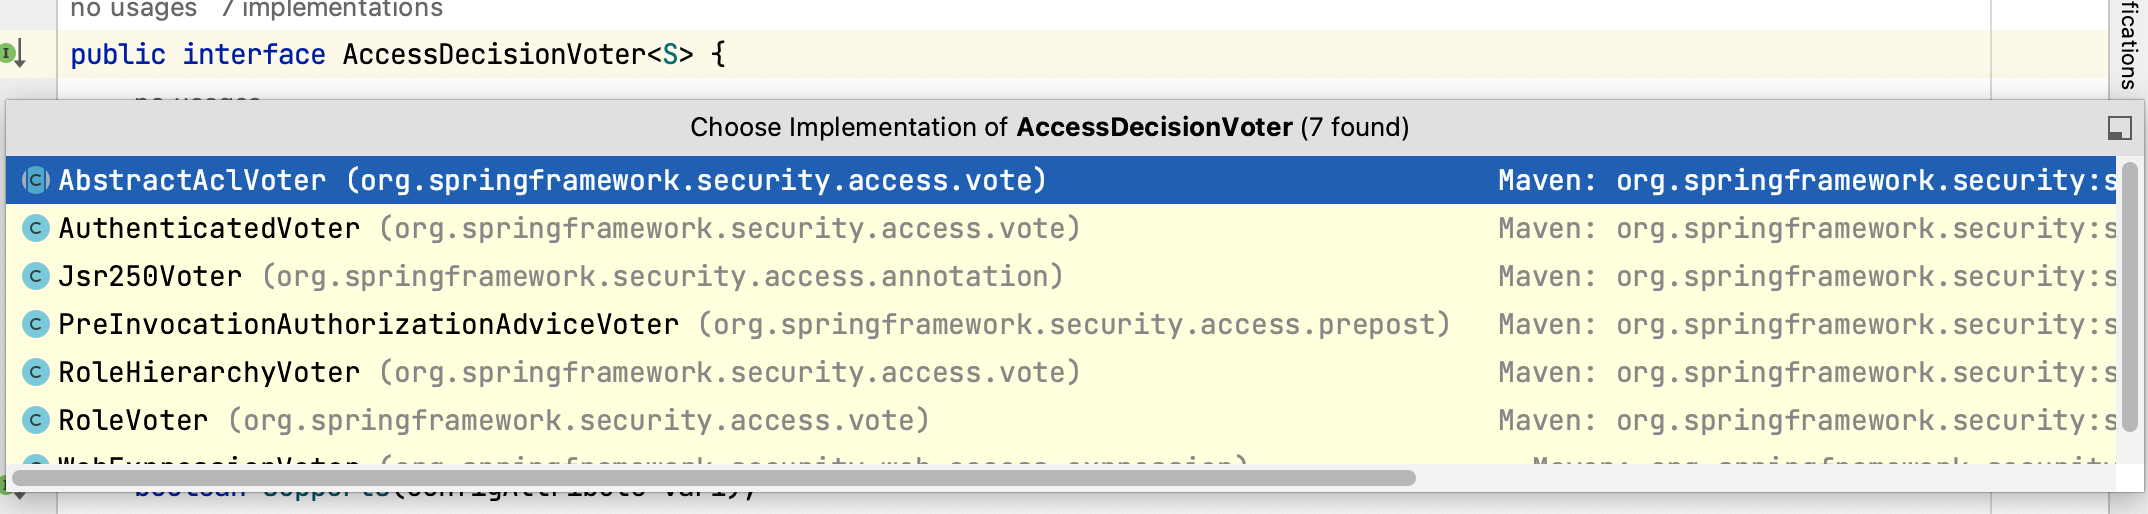
- 投票器:AccessDecisionVoter
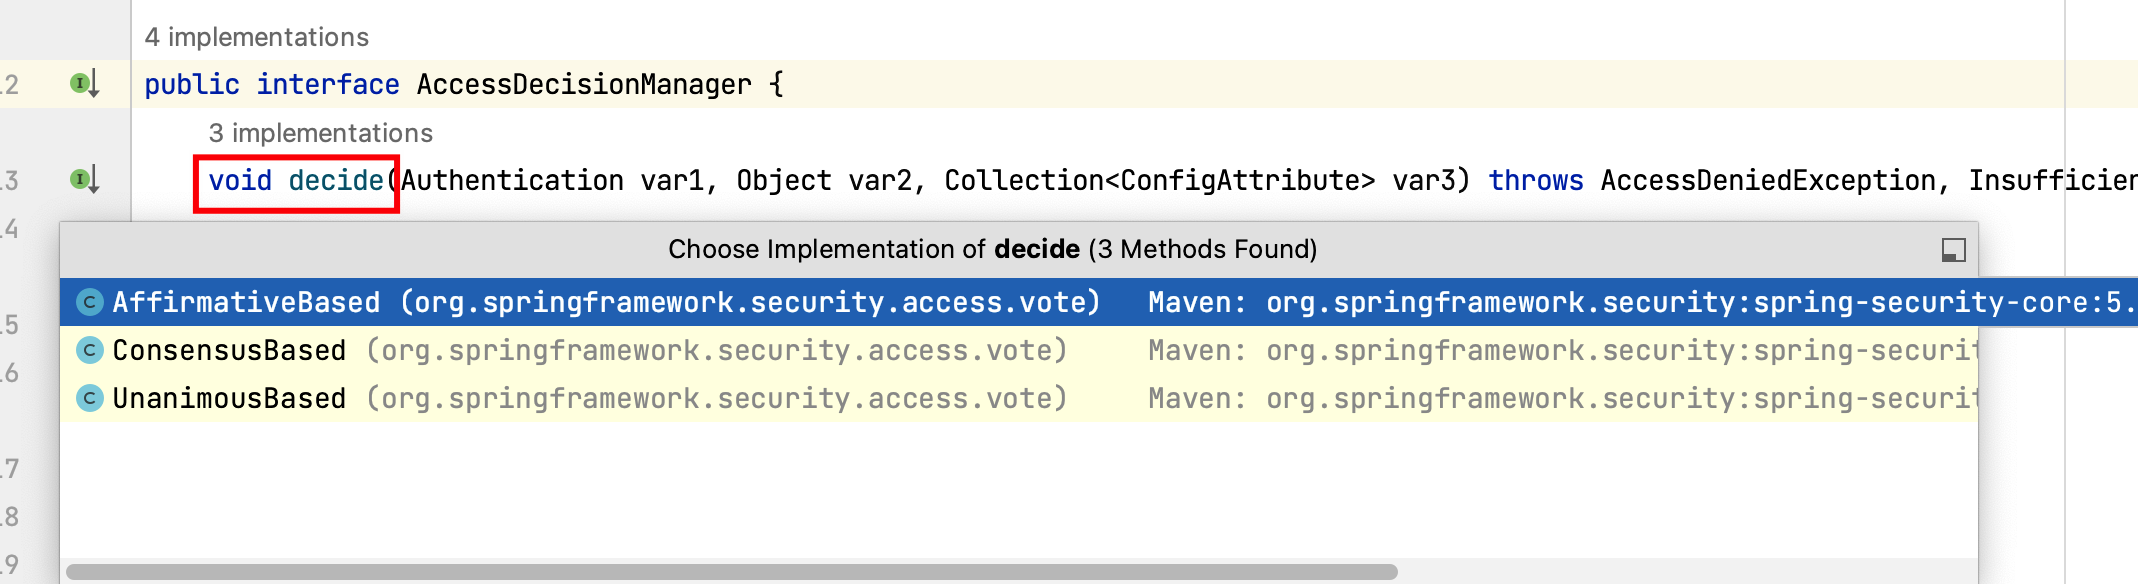
- 决断者:AccessDecisionManager
AccessDecisionVoter接口:投票器,在授权的时通过投票的方式来决定用户是否可以访问,这里涉及到投票规则。
AccessDecisionManager接口:决断者,决定用户是否可以访问某个资源,实现这个接口可以定制我们自己的授权逻辑。

decide()方法是决断逻辑。security自带的决断方式有三种:
AffirmativeBased:只要有一个投票器投票通过,就允许用户访问ConsensusBased:必须有一定比例的投票器投票通过才能允许用户访问资源UnanimousBased:表示必须所有的投票器都投票通过才能允许用户访问资源。
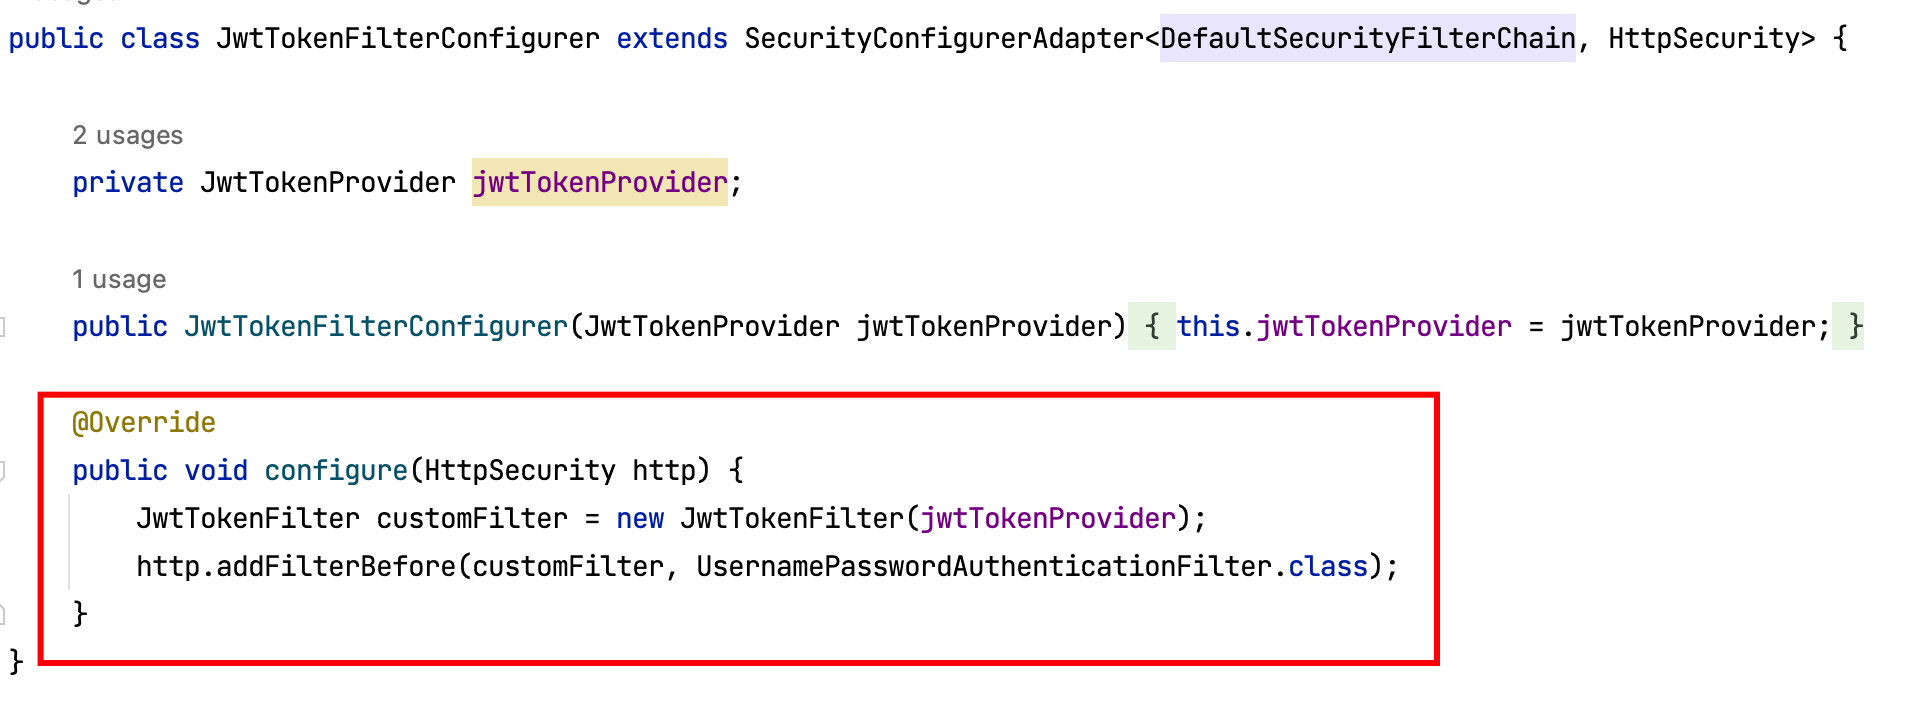
过滤器链(Filter Chain)
每个过滤器都负责执行不同的任务,如认证、授权、防止攻击等。这些过滤器可以被组合成一个过滤器链,以确保每个请求都按顺序通过所有的过滤器。
例如我这里,过滤器链中只有jwtTokenFilter,负责身份认证。
密码加密(PasswordEncoder)
摘要加盐是指在对数据进行摘要(哈希)计算时,首先将一个随机的、长度适当的字符串(盐)与数据进行拼接,然后再对拼接后的结果进行哈希计算。最终的哈希值是盐和数据的哈希值的组合。
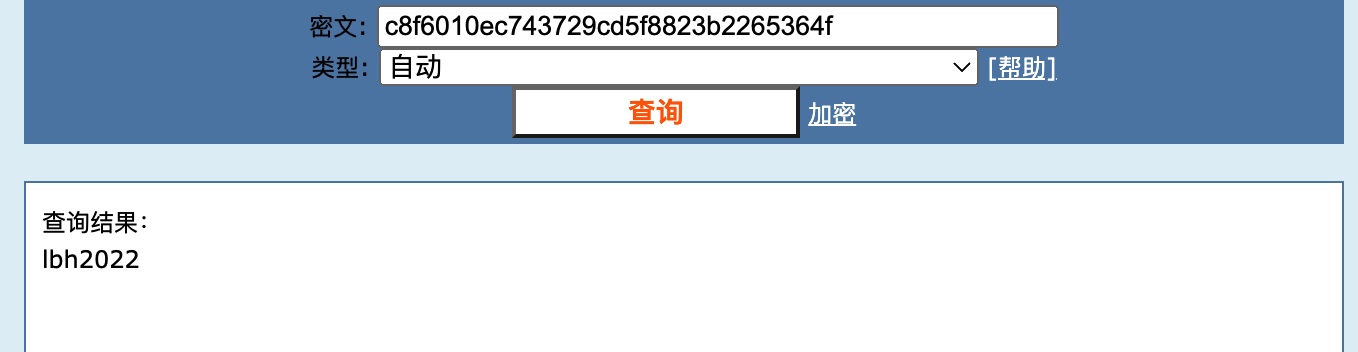
不加密的危害:
c8f6010ec743729cd5f8823b2265364f
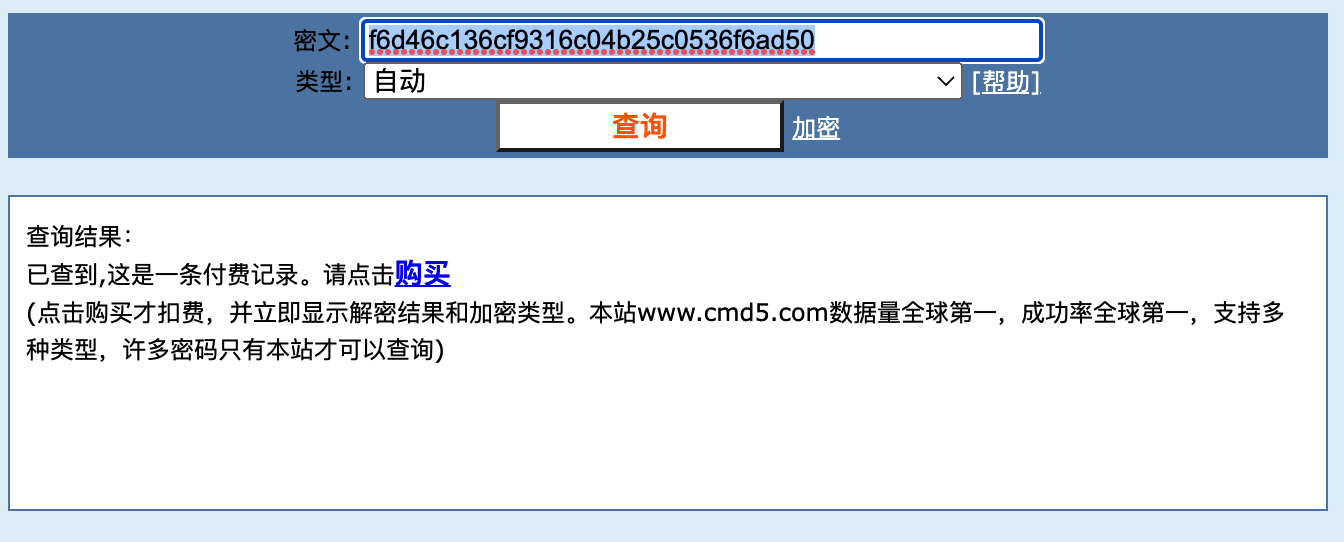
f6d46c136cf9316c04b25c0536f6ad50(8位大小写、字母、数字、符号)
从Spring Security 5.0版本开始,PasswordEncoder默认使用BCryptPasswordEncoder进行密码加密。他的实现类代码如下:(采用安全随机数生成盐值)
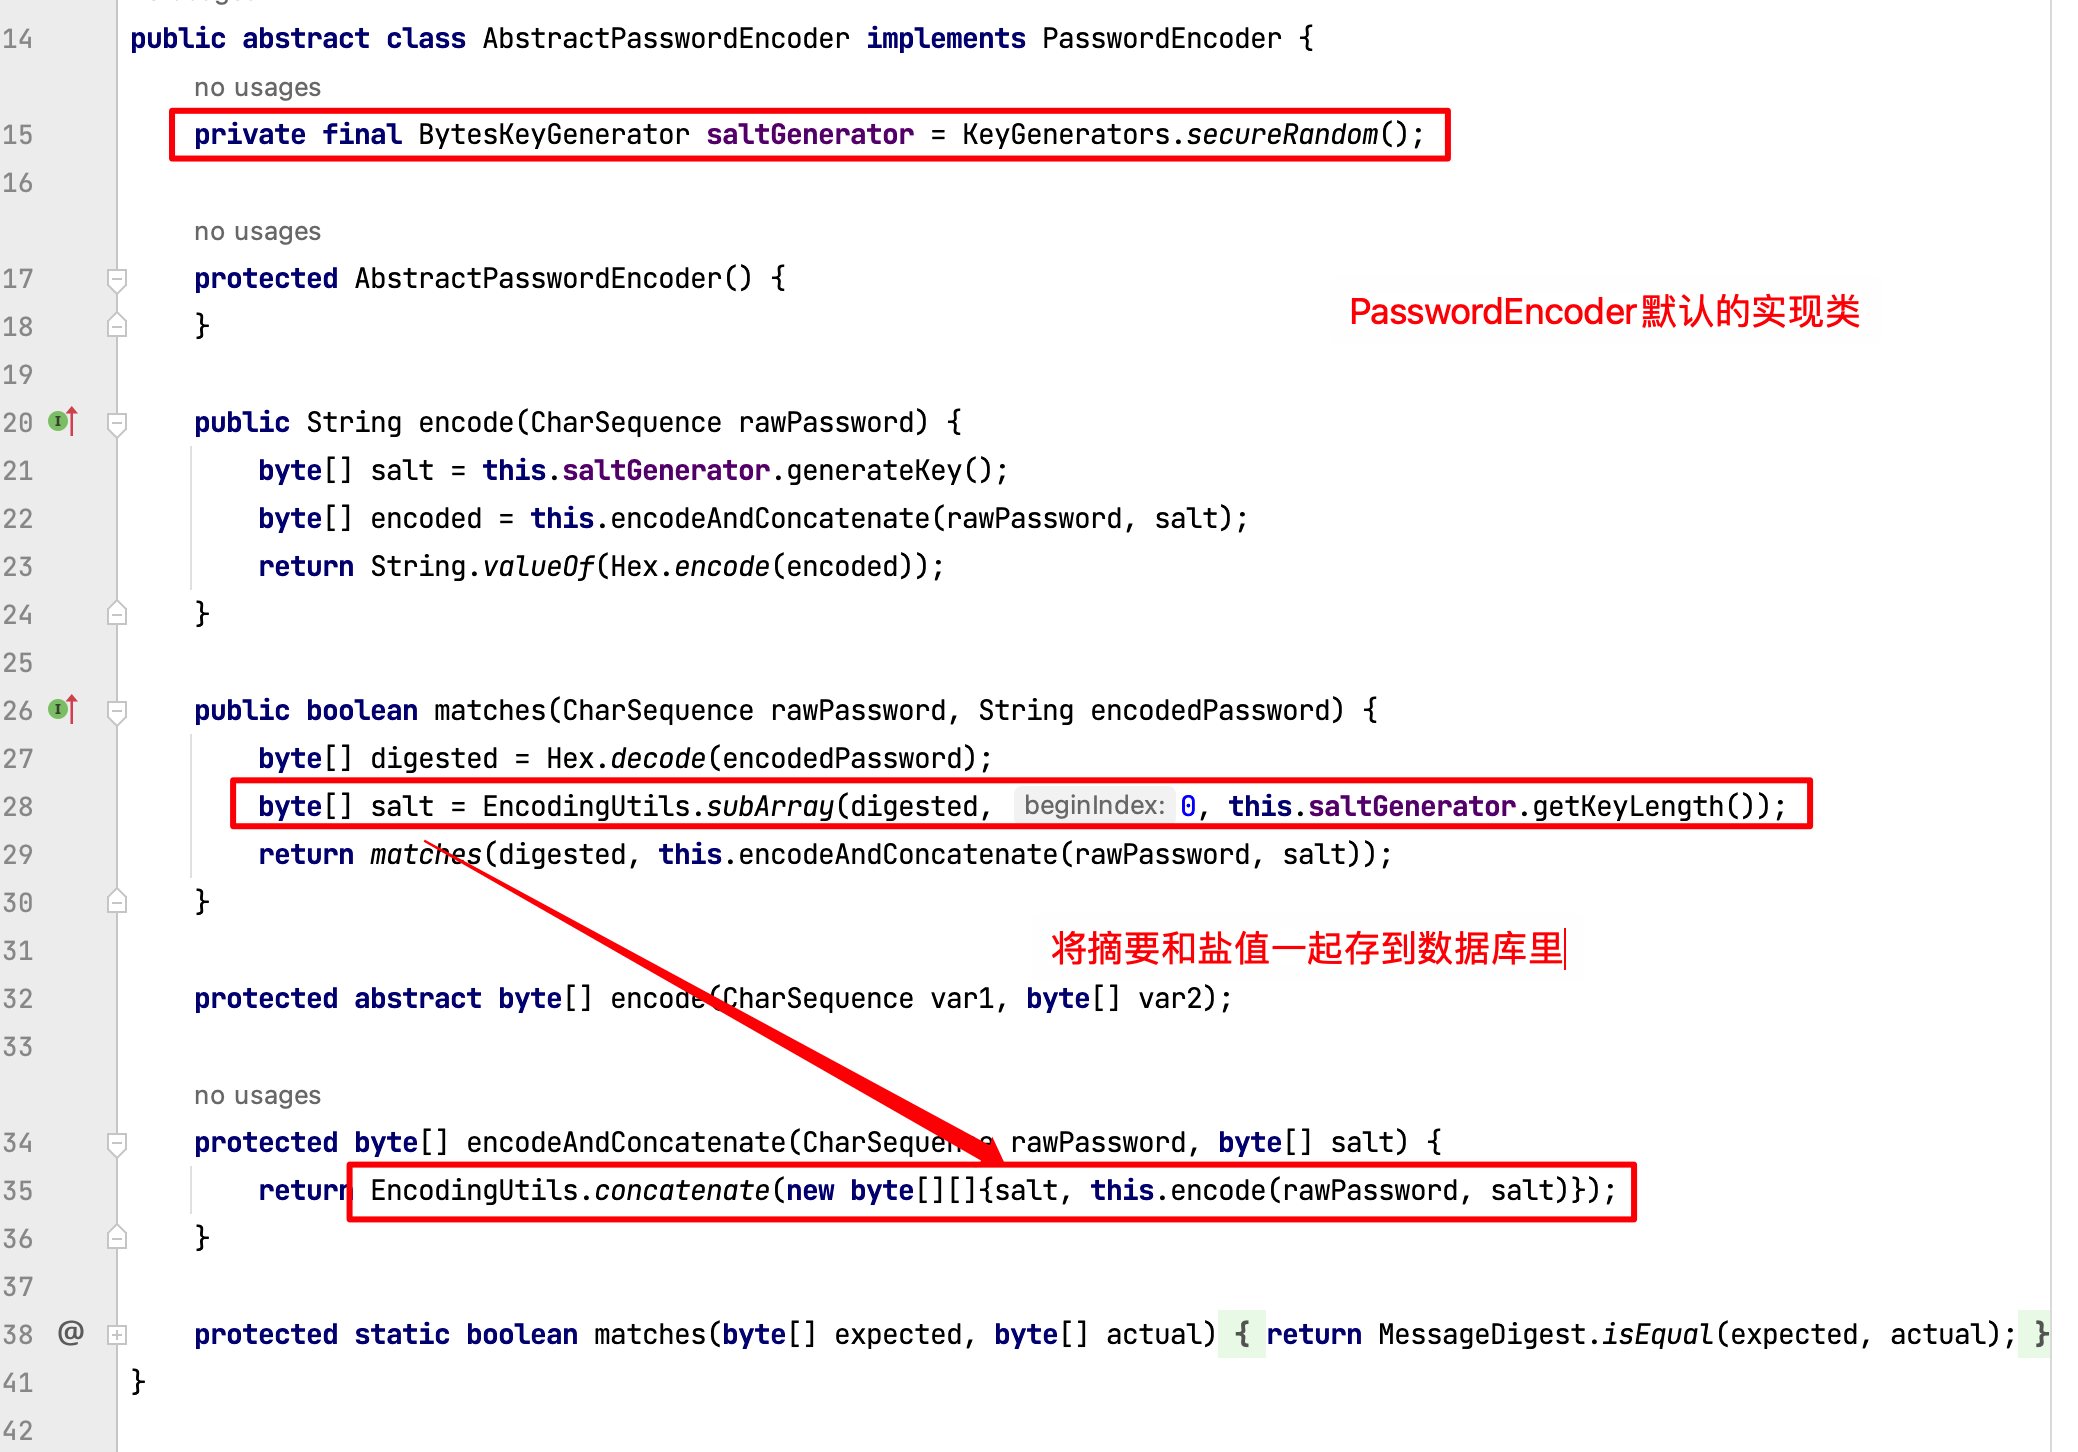
在数据库中存储情况:
用户详情服务(UserDetailsService)
用于加载用户的详细信息,例如用户名、密码和角色等。
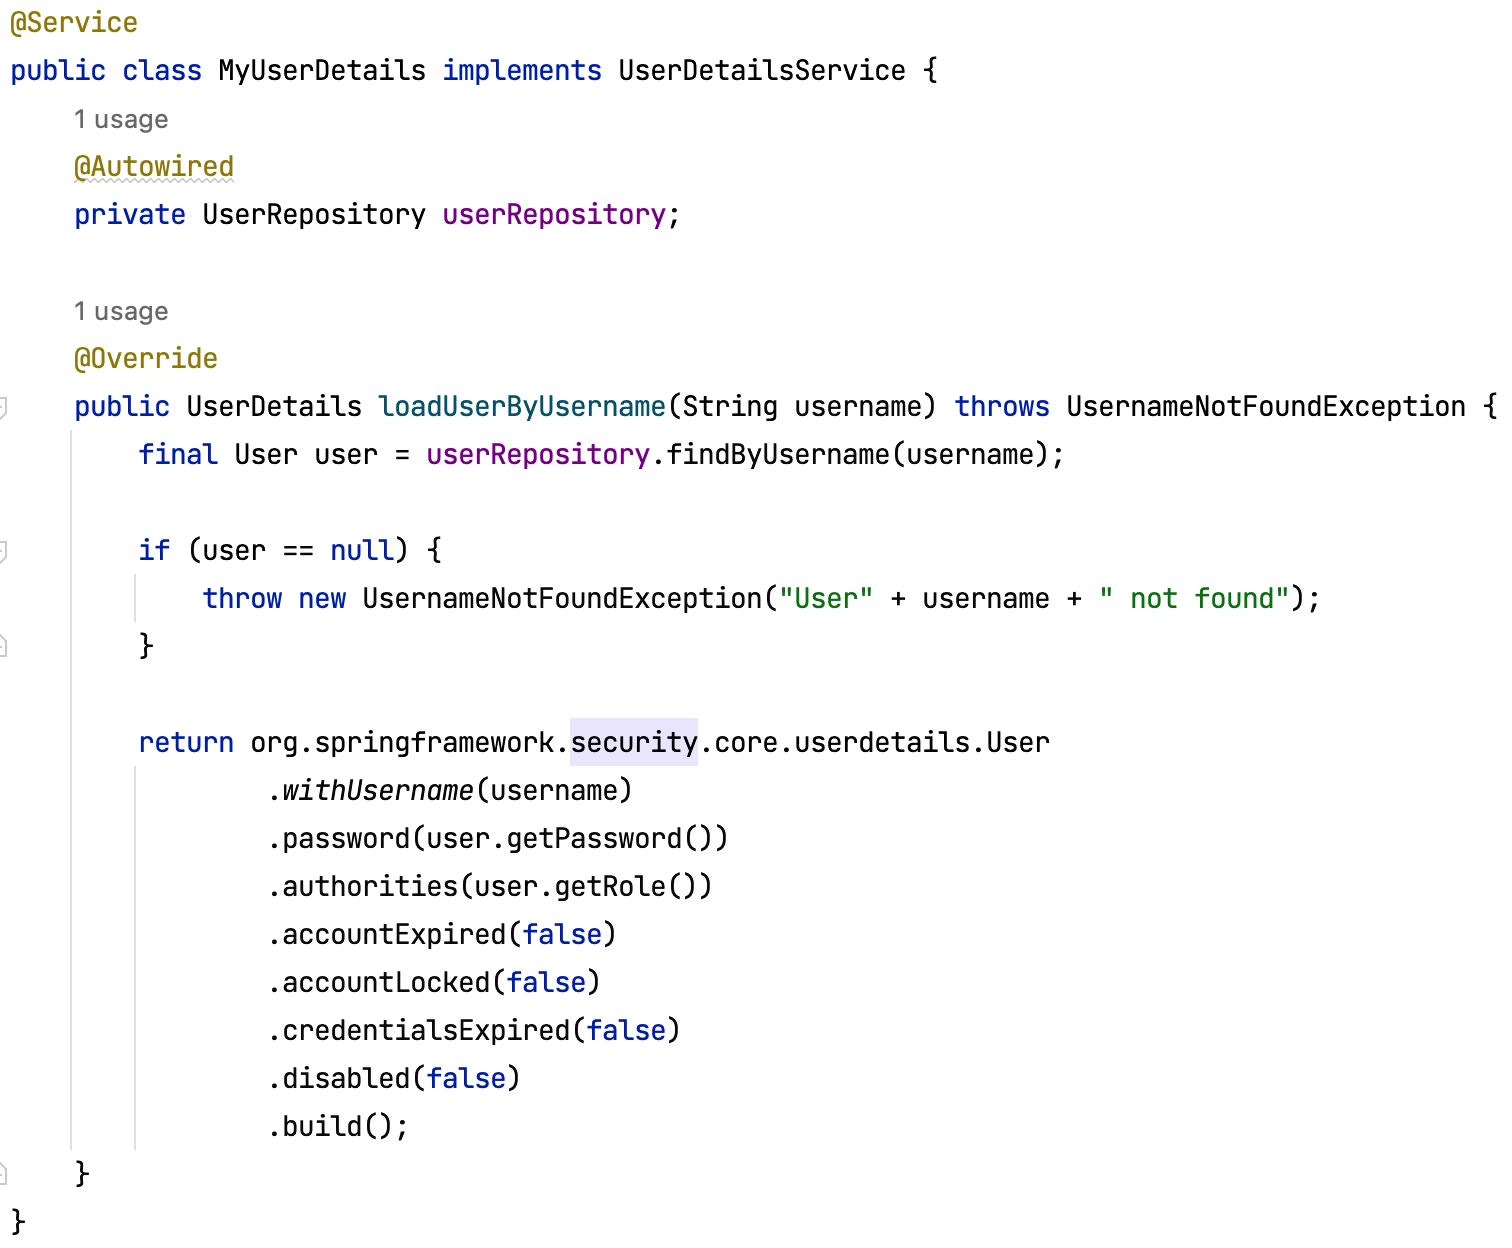
1 | // 处理用户过期 |
应用示例
Security实现身份鉴别
用户提交登录表单
表单中的用户名和密码被提交给Controller:
- 创建
UsernamePasswordAuthenticationToken对象,封装用户名和密码 - 创建一个
Authentication对象,并使用AuthenticationManager进行认证
1
2
3
4
5
6
7
8
9
10
11
12
13
14
15
16
17
18
19
20
21
22
23
24
25
26
public class UserController {
private AuthenticationManager authenticationManager;
private HttpSession httpSession;
public String login( String username, String password) {
**UsernamePasswordAuthenticationToken authReq
= new UsernamePasswordAuthenticationToken(username, password);**
**Authentication auth = authenticationManager.authenticate(authReq);**
SecurityContextHolder.getContext().setAuthentication(auth);
httpSession.setAttribute("user", auth.getPrincipal());
return "redirect:/home";
}
public String home(Model model, Authentication authentication) {
UserDetails userDetails = (UserDetails) authentication.getPrincipal();
model.addAttribute("username", userDetails.getUsername());
return "home";
}
}- 创建
AuthenticationManager使用DaoAuthenticationProvider进行认证,比较用户输入的密码和从数据库中获取的密码DaoAuthenticationProvider用于从数据库中验证用户的用户名和密码,实现基于数据库的身份认证。- 如果密码匹配,则返回一个认证通过的Authentication对象,否则返回一个认证失败的Authentication对象
如果认证通过,用户信息存储在SecurityContextHolder中,并存入httpSession。
创建一个名为
HeaderHttpSessionStrategy的类,该类实现了HttpSessionStrategy接口,用于将session存储到请求头中:1
2
3
4
5
6
7
8
9
10
11
12
13
14
15
16
17public class HeaderHttpSessionStrategy implements HttpSessionStrategy {
public String getRequestedSessionId(HttpServletRequest request) {
return request.getHeader("SESSION_ID");
}
public void onNewSession(HttpSession session, HttpServletRequest request, HttpServletResponse response) {
r**esponse.setHeader("SESSION_ID", session.getId());**
}
public void onInvalidateSession(HttpServletRequest request, HttpServletResponse response) {
response.setHeader("SESSION_ID", "");
}
}
将用户重定向到指定的页面,完成登录过程
注:Security配置如下
1 |
|
手工方式实现身份鉴别
使用Java Servlet和JDBC来手动实现身份验证过程的例子:
Filter是Servlet用于拦截请求和响应的机制,可以在请求到达Servlet之前或响应返回客户端之前对其进行预处理或后处理。
1 | public class AuthenticationFilter implements Filter { |
Security实现访问控制
- Controller Mapping访问配置
1 | // DeviceController.java |
- 全局配置
1 | // SecurityConfiguration.java |
关于
antMatchers:使用Ant样式的URL模式进行匹配,用于配置URL请求路径匹配规则。Ant样式的URL匹配规则支持的通配符有两种,分别是**
*和****,它们的作用如下:
*通配符:用于匹配单个路径段中的任意字符。例如,**/user/*/info可以匹配/user/123/info、/user/abc/info**等URL路径。- **
**通配符:用于匹配多个路径段中的任意字符,包括子路径。例如,/user/**可以匹配/user/info、/user/123/info、/user/abc/info**等URL路径。
手工实现访问控制
亦通过Servlet的Filter实现。这里只实现了根据用户名的用户级权限控制,如果要实现角色级权限控制,还需自己建立角色Map。
1 | public class AccessControlFilter implements Filter { |
Session管理
1 | // SecurityConfiguration.java |
- **
invalidSessionUrl("/login?error=session")表示当Session失效时,重定向到/login?error=session**页面 - **
maximumSessions(1)**表示同一用户只能存在一个Session - **
expiredUrl("/login?error=session")表示当Session超时时,重定向到/login?error=session**页面 - **
sessionRegistry(sessionRegistry())**表示使用SessionRegistryImpl进行Session管理 - **
sessionCreationPolicy(SessionCreationPolicy.ALWAYS)**表示始终创建Session
Spring Security 简介、原理及使用